目录
一、理解PureMVC
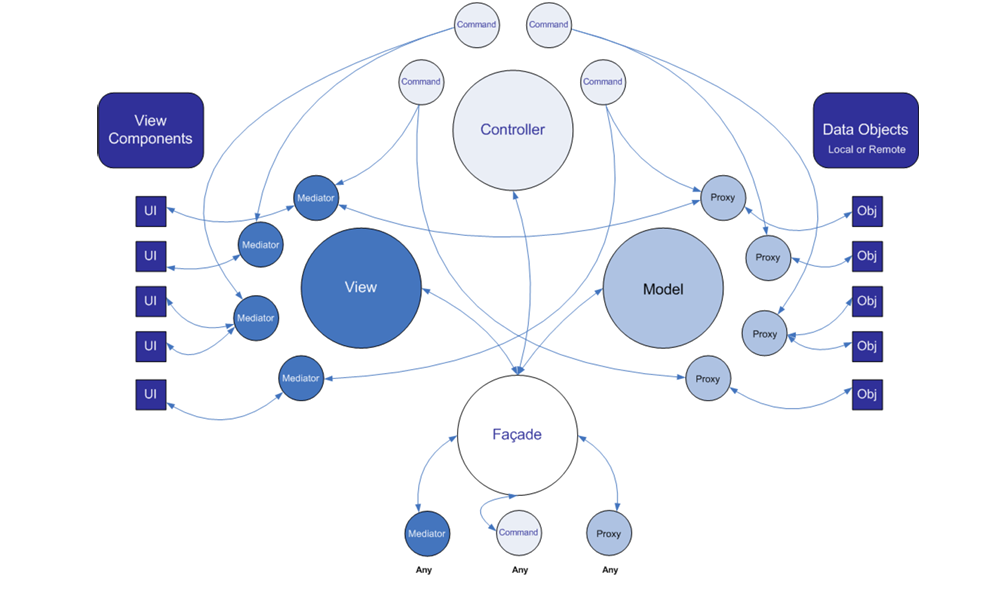
PureMVC 的框架如图所示:
PureMVC 框架
如果你曾看过 GOF (Group of
Four,即四人帮)关于设计模式的书籍,那么你绝对遇到过图中的大多数术语。我虽然没有看过这本书,但是我看过 《设计模式与游戏完美开发》
一书,在这本书中,我就接触到了外观模式(Facade)、命令模式、代理模式(Proxy)、观察者模式的运用,我在此只列举出了一些模式,如果你感兴趣,可以找这本书看看,这本书是从
《P级阵地》 ——一款塔防游戏入手开始讲解设计模式是如何运用到游戏中的,我相信看过这本书的家伙一定受益匪浅。
回到我们的主题PureMVC,图中有 Model、View和Controller三个经典要素,除此之外,我们还能看见 Facade,说明其运用了外观模式的思想。我们再看看
Facade 管理哪些元素——Mediator、Command和Proxy。
我相信注意力惊人的读者应该早就注意到 Mediator 其实是和 View 有关的;Proxy 和 Model 有关;Command 和 Controller 有关。
属于 View Component(视图组件)的UI元素和 Mediator 相联系;属于 Data Objects(数据对象)的元素和 Proxy 相联系;而 Mediator 和 Proxy 通过 Command
相互联系(就像一般的MVC框架中 Model 和 View 通过 Controller 互相联系一样)。
在PureMVC中,我们不直接使用 Model、View和Controller,而是使用 Proxy、Mediator 和 Command互相配合实现UI功能。
你是否注意到了,我其实没有提及到图中的所有元素! 我忽略了将各个元素连接的线,这些线表示 通知(Notification)。
在继续讲解之前,我先把 PureMVC 框架源代码的获取途径先展示出来,大家可以访问The PureMVC
framework寻找源代码仓库链接和官方说明文档。这是其API文档,Live
Documenter API Documentation
官方说明文档有各种语言的版本,可以按需下载;大家能通过读文档了解到框架各个类的职责和如何使用该框架。
二、如何在Unity使用PureMVC
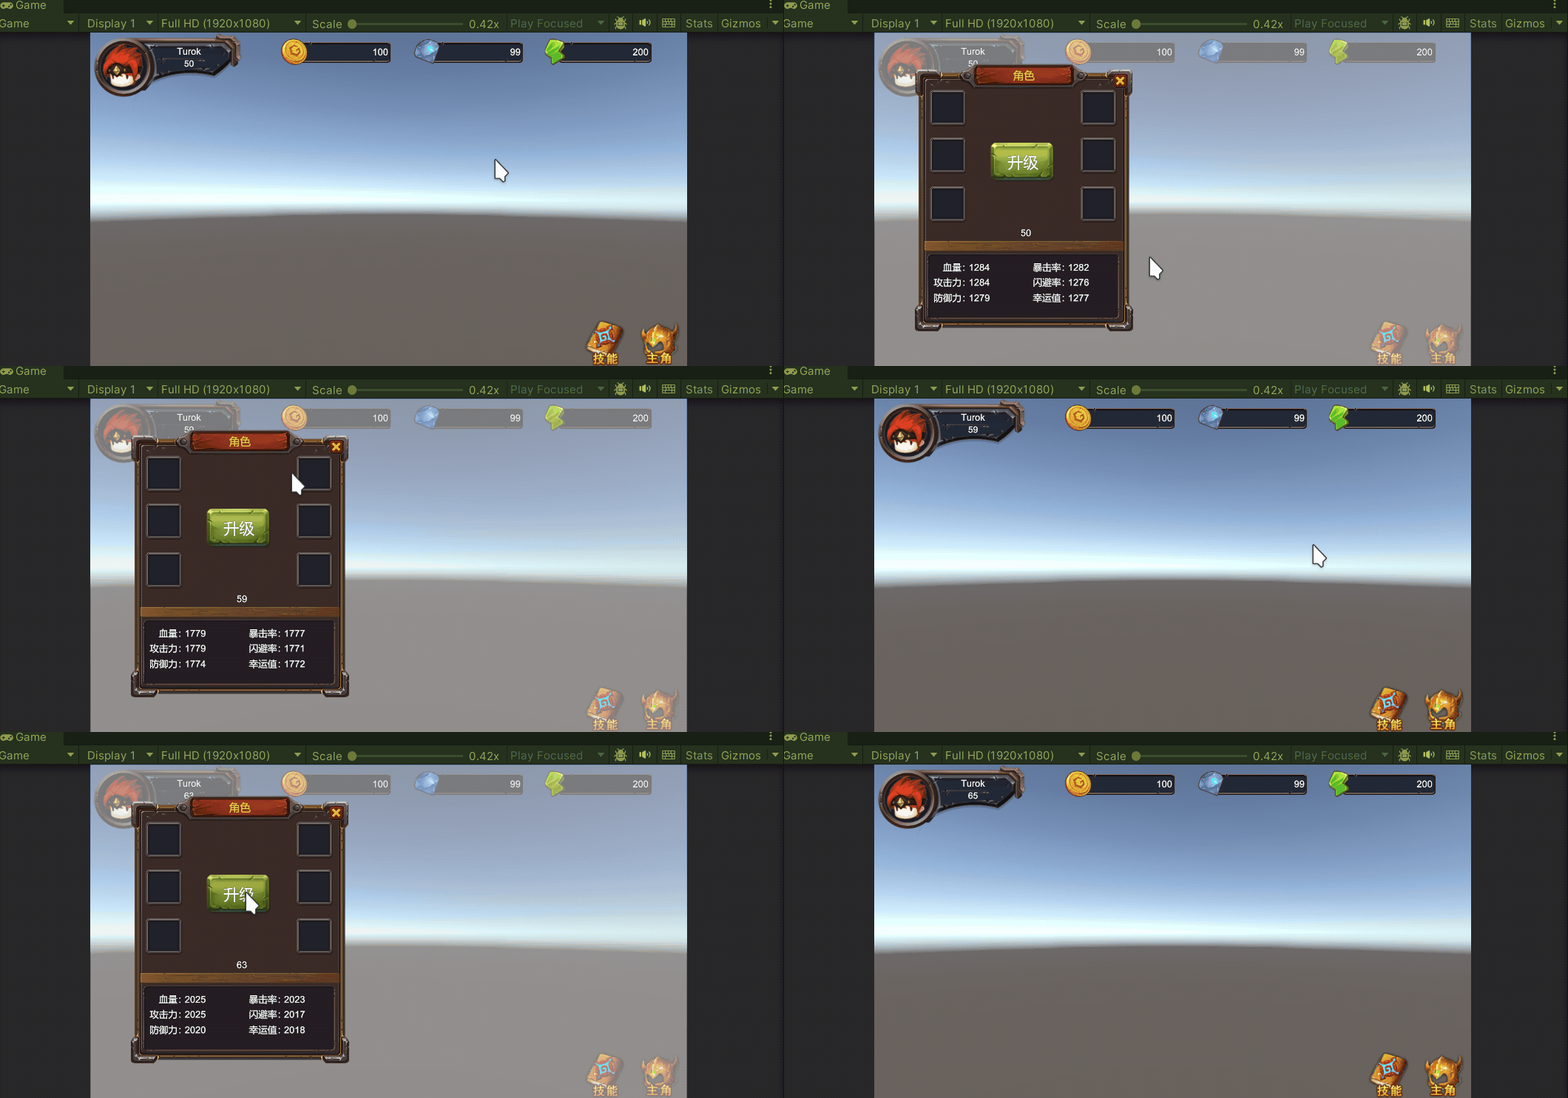
该项目出自唐老狮的MVC框架的讲解视频。本文示例项目是创建一个主面板,主面板上面会显示玩家姓名、等级、金钱、钻石和体力值等元素。主面板可以通过按键 M 显示,N隐藏。
当点击主面板上的角色按钮时,会打开角色面板,在角色面板中会显示玩家等级、体力值、攻击力、防御值、闪避值、暴击率和幸运值等数据。角色面板可以按右上角的X隐藏。
角色面板上有一个升级按钮,按下后角色的等级、体力值等都会改变,面板上也需要显示。
项目示例
1. 从简单的开始
首先,我们仍然需要创建一个具体的数据类,也就是开篇给出的图中的 Data
Objects。如果这个数据是和玩家相关的,那么我们不妨命名为PlayerDataObj,这个脚本中我们一般只放数据相关的成员,例如玩家的生命值、金钱和攻击力等等。由于这是个数据类,所以不必继承Monobehaviour。在本文示例中的代码如下:
/// <summary>
/// 玩家数据类
/// </summary>
public class PlayerDataObj
{
    public string name;
    public int lev;
    public int money;
    public int gem;
    public int power;

    public int hp;
    public int atk;
    public int def;
    public int miss;
    public int crit;
    public int luck;
}
接着,我们需要创建UI面板类,即和视图相关的类,在这个类中我们存放的是UI控件,以及对UI控件更新的成员方法,我当前展示的是主面板NewMainView的脚本,代码如下:
/// <summary>
/// 主面板视图
/// </summary>
public class NewMainView : MonoBehaviour
{
    // UI 文本控件 和 按钮控件
    public Text txtName;
    public Text txtLev;
    public Text txtMoney;
    public Text txtPower;
    public Text txtGem;

    public Button btnRole;

    /// <summary>
    /// 更新 UI文本控件内容
    /// </summary>
    /// <param name="data">玩家数据</param>
    public void UpdateInfo(PlayerDataObj data)
    {
        txtName.text = data.name;
        txtLev.text = data.lev.ToString();
        txtMoney.text = data.money.ToString();
        txtPower.text = data.power.ToString();
        txtGem.text = data.gem.ToString();
    }
}
同理,创建角色面板,代码如下:
/// <summary>
/// 角色面板视图
/// </summary>
public class NewRoleView : MonoBehaviour
{
    // UI 文本控件以及按钮控件
    public Text txtLev;
    public Text txtHp;
    public Text txtAtk;
    public Text txtDef;
    public Text txtCrit;
    public Text txtMiss;
    public Text txtLuck;

    public Button btnClose;
    public Button btnLevUp;

    /// <summary>
    /// 更新面板数据
    /// </summary>
    /// <param name="data">玩家数据</param>
    public void UpdateInfo(PlayerDataObj data)
    {
        txtLev.text = data.lev.ToString();
        txtHp.text = data.hp.ToString();
        txtAtk.text = data.atk.ToString();
        txtDef.text = data.def.ToString();
        txtCrit.text = data.crit.ToString();
        txtMiss.text = data.miss.ToString();
        txtLuck.text = data.luck.ToString();
    }
}
这样,我们就完成了UI控件和Obj,对应图中的UI和Obj元素。以后如果有敌人数据,也应该创建类似玩家数据的EnemyDataObj类;如果有新面板,也应该创建新的面板类,假如有一个技能面板,就应该创建一个专门管理该面板上的UI元素的SkillView类。其实到这里,虽然没有用上PureMVC框架的内容,但是也感觉到了一点——解耦的开端。
2. 实现玩家数据类的代理类
我创建了一个名为PlayerProxy的脚本,代码如下:
/// <summary>
/// 玩家数据类对于的代理类
/// </summary>
public class PlayerProxy : Proxy
{
    public new const string NAME = "PlayerProxy";

    // 构造函数,Facade会管理这个类
    public PlayerProxy() : base(NAME)
    {
        PlayerDataObj data = new PlayerDataObj();

        // 初始化好一个数据,并交付给 Proxy 的 Data
        data.name = PlayerPrefs.GetString("PlayerName", "Turok");
        data.money = PlayerPrefs.GetInt("PlayerMoney", 100);
        data.gem = PlayerPrefs.GetInt("PlayerGem", 99);
        data.power = PlayerPrefs.GetInt("PlayerPower", 200);

        data.lev = PlayerPrefs.GetInt("PlayerLev", 1);
        data.hp = PlayerPrefs.GetInt("PlayerHp", 10);
        data.atk = PlayerPrefs.GetInt("PlayerAtk", 10);
        data.def = PlayerPrefs.GetInt("PlayerDef", 5);
        data.crit = PlayerPrefs.GetInt("PlayerCrit", 8);
        data.miss = PlayerPrefs.GetInt("PlayerMiss", 2);
        data.luck = PlayerPrefs.GetInt("PlayerLuck", 3);

        Data = data; // 里氏替换原则,用父类容器装子类
    }

    /// <summary>
    /// 升级
    /// </summary>
    public void LevUp()
    {
        PlayerDataObj data = Data as PlayerDataObj;

        data.lev += 1;

        data.hp += data.lev;
        data.atk += data.lev;
        data.def += data.lev;
        data.crit += data.lev;
        data.miss += data.lev;
        data.luck += data.lev;
    }

    public void SaveData()
    {
        PlayerDataObj data = Data as PlayerDataObj;

        PlayerPrefs.SetString("PlayerName", data.name);
        PlayerPrefs.SetInt("PlayerLev", data.lev);
        PlayerPrefs.SetInt("PlayerGem", data.gem);
        PlayerPrefs.SetInt("PlayerMoney", data.money);
        PlayerPrefs.SetInt("PlayerPower", data.power);

        PlayerPrefs.SetInt("PlayerHp", data.hp);
        PlayerPrefs.SetInt("PlayerAtk", data.atk);
        PlayerPrefs.SetInt("PlayerDef", data.def);
        PlayerPrefs.SetInt("PlayerCrit", data.crit);
        PlayerPrefs.SetInt("PlayerMiss", data.miss);
        PlayerPrefs.SetInt("PlayerLuck", data.luck);
    }
}
在此需要说明几点:
-
PlayerProxy类是负责我们之前创建的PlayerDataObj类的,正如开篇给出的框架总图中,Proxy和Obj有着联系。 PlayerProxy需要继承Proxy类,并实现其中的有参构造函数。-
关于这个有参构造函数,
public Proxy(string proxyName, object data = null),参数proxyName表示这个代理的名字,data如果未传入,则默认值为null,我们传入的是数据类,在这我们需要传入的就是PlayerDataObj对象。如果我们没有传入,那我们需要在内部创建数据类对象,并执行一些初始化操作,就像代码中所做的那样。 -
在有参构造函数中,有一句
Data = data;,其中data是我们实例化的PlayerDataObj对象,但是Data是属性,public object Data { get; set; },表示代理的数据。其实这个有参构造函数做了两件事情,第一件事情:赋予这个代理一个名字(相当于标识符了,有名字才能通过Facade快速找到);第二件事情:存好Data,相当于建立这个 代理 和 一个 数据之间的联系。 LevUp()、SaveData()这两个方法,是对数据的操作,以前我们使用MVC思想,把数据和对数据的操作放在了同一个 Model 模块,现在我们解耦,把数据放一个地方,把对数据的操作放在了 这个代理处,怎么样,是不是有点解耦的感觉了。-
在
LevUp()、SaveData()两个方法中,有Data as PlayerDataObj的转换,是因为Data是object类型的,需要转换成对应类型后才能使用。 -
public new const string NAME = "PlayerProxy";中的new关键字表示重写了父类Proxy的NAME成员。
3. 实现一个通知类
如果你查看过官网上Implementation Idioms and Best Practices的PDF文件,你会看到其中使用ActionScript3实现的程序中,通知常量是直接放在ApplicationFacade类(实现的Facade)中的。
在本示例项目中,将单独创建一个类,存储通知名。代码如下:
/// <summary>
/// PureMVC 中声明各种 “通知名” 的类
/// </summary>
public class PureNotification
{
    /// <summary>
    /// 开始
    /// </summary>
    public const string START_UP = "Start_Up";
    /// <summary>
    /// 显示面板
    /// </summary>
    public const string SHOW_PANEL = "Show_Panel";
    /// <summary>
    /// 更新主面板信息
    /// </summary>
    public const string UPDATE_MAINVIEW_INFO = "Update_MainView_Info";
}
在此也需要说明:
- 该类中的所有成员都是常量,意味着我们无法更改它们;
- 在《PureMVC_IIBP_Chinese》中,提及到 “ 当这些Notification
的名称常量需要被其他的程序访问时,我们可以使用单独的“ApplicationConstants”类来存放这些 Notification 名称常量定义。
不管什么时候,都应该把Notification(通知)名称定义为常量,需要引用一个Notification 时就使用它的名称常量,这样做可以避免一些编译时无法
发现的错误。因为编译器可以检查常量;而使用字符串,如果你手误输入错 误的字符串,编译器也不法知道,也无从报错。 ”
,其中就有我们创建这个
PureNotification类的原因。 - 变量名使用全大写,下划线分隔,是遵循命名规范。
4. 为主面板和角色面板编写Mediator类
在前面,我们为PlayerDataObj类写了对应的PlayerProxy类。现在,我们将为NewMainView和NewRoleView编写对应的NewMainViewMediator和NewRoleViewMediator类。
Mediator
对象的职责是操作对应的面板的组件,例如NewMainViewMediator直接操作NewMainView中的文本控件。
Mediator保存了一个或者多个 View Component的引用,在Unity中就是
UGUI的Text、Button、Image等组件,通过Mediator的属性ViewComponent来管理这些组件。
我先给出NewMainViewMediator和NewRoleViewMediator的相关代码,然后再对具体的代码进行说明:
/// <summary>
/// 主视图的 Mediator
/// </summary>
public class NewMainViewMediator : Mediator
{
    // Mediator 的名字
    public new static string NAME = "NewMainViewMediator";

    // 构造函数
    // 父类 Mediator 的构造函数中执行的操作如下:
    // 1. 设置 Mediator 的名字
    // 2. 设置 ViewComponent 的内容,ViewComponent即视图组件,在这里就是UGUI中的Text、Button组件等
    public NewMainViewMediator() : base(NAME)
    {

    }

    // 列出 Mediator 感兴趣的通知名称
    // 返回值是一个 string数组,里面就存放我们需要注意的通知名
    public override string[] ListNotificationInterests()
    {
        // 像事件需要传入方法名一样,这里传入需要监听的通知名
        return new string[]
        {
            PureNotification.UPDATE_MAINVIEW_INFO
        };
    }

    // Mediator 处理通知的逻辑
    // 传入一个 INotification 对象,这个对象中包含了名称(Name)和 相关的内容(也被称作主体,Body)
    // 在Implementation Idioms and Best Practices 中,关于该方法的使用,有提及最好使用switch条件判断语句来处理不同通知的逻辑
    public override void HandleNotification(INotification notification)
    {
        // 在上面的 ListNotificationInterests()方法中监听了通知
        // 在本方法中则处理监听的通知
        switch (notification.Name)
        {
            case "Update_MainView_Info":
                // 当执行这个通知中的逻辑时,将更新主面板的数据
                (ViewComponent as NewMainView).UpdateInfo(notification.Body as PlayerDataObj);
                break;
        }
    }
}
/// <summary>
/// 角色面板的 Mediator
/// </summary>
public class NewRoleViewMediator : Mediator
{
    public new static string NAME = "NewRoleViewMediator";

    public NewRoleViewMediator() : base(NAME)
    {

    }

    public override string[] ListNotificationInterests()
    {
        // 像事件需要传入方法名一样,这里传入需要监听的通知名
        return new string[]
        {
            PureNotification.UPDATE_MAINVIEW_INFO
        };
    }

    public override void HandleNotification(INotification notification)
    {
        // 在上面的 ListNotificationInterests()方法中监听了通知
        // 在本方法中则处理监听的通知
        switch (notification.Name)
        {
            case "Update_MainView_Info":
                // 当执行这个通知中的逻辑时
                (ViewComponent as NewRoleView).UpdateInfo(notification.Body as PlayerDataObj);
                break;
        }
    }
}
在这里说明:
- 继承
Mediator类以实现一个具体的Mediator。 - 该类使用
new关键字覆盖了父类的NAME属性。 - 父类中的构造函数中做了两件事情,第一件事情:赋予这个具体的
Mediator类名字;第二件事情:设置ViewComponent,视图上的相关组件。 ListNotificationInterests()列出了这个具体的Mediator感兴趣的通知,像 监听事件一样。HandleNotification()中表示如果收到通知,具体的Mediator应该要根据通知名做出不同的行为。
需要强调的是,如果
ListNotificationInterests()中没有添加感兴趣的通知,那么就算HandleNotification()中有接收这个通知后执行的逻辑,也不会执行!如果HandleNotification()没有写接收这个通知后执行的逻辑,即使添加了感兴趣的通知,也不会做任何事!
5. 开始写命令 Command
在完成数据层的代码后,我们紧接着写了视图层的代码,也就是说我们已经依次完成了Proxy和Mediator相关的部分。接下来,我们将完成Command的部分。
在给出代码前,我希望读者能理解 Command 的职责:
- 在背后默默工作的家伙——处理一些视图和数据层交互的逻辑。
- 专门做某一件事情,因为 Command 处理的逻辑本来就很多,如果所有事情都交给它来做,它会累垮的——一个 Command 负责 一件事。
下面是
StartUpCommand,ShowPanelCommand、LevUpCommand的代码,以及更新后的PureNotification代码:
更新后的PureNotification代码,添加了 LEV_UP和HIDE_PANEL字符串。
/// <summary>
/// PureMVC 中声明各种 “通知名” 的类
/// </summary>
public class PureNotification
{
    /// <summary>
    /// 开始
    /// </summary>
    public const string START_UP = "Start_Up";
    /// <summary>
    /// 显示面板
    /// </summary>
    public const string SHOW_PANEL = "Show_Panel";
    /// <summary>
    /// 隐藏面板
    /// </summary>
    public const string HIDE_PANEL = "Hide_Panel";
    /// <summary>
    /// 更新主面板信息
    /// </summary>
    public const string UPDATE_PLAYER_INFO = "Update_Player_Info";
    /// <summary>
    /// 升级
    /// </summary>
    public const string LEV_UP = "Lev_Up";
}
下面是StartUpCommand的代码:
public class StartUpCommand : SimpleCommand
{
    // 1. 继承SimpleCommand类
    // 2. 重写Execute()方法
    public override void Execute(INotification notification)
    {
        // 命令模式,外部如果发送了通知,就会执行这里面的逻辑
        // notification 中存储着 Name 和 Body 等重要信息
        base.Execute(notification);

        // 开始时,需要注册 数据的代理 并初始化数据
        if (!Facade.HasProxy(PlayerProxy.NAME))
        {
            Facade.RegisterProxy(new PlayerProxy());
        }
    }
}
在此需要说明:
- 我们编写的某个具体的 Command 类,在这里指的就是
StartUpCommand,需要继承 SimpleCommand 类。 - 重写
Execute()方法,这个 Command 会在 全局唯一的 Facade 中 注册,注册时会将一个通知名和一个命令作为参数传入,这样一来,如果某处发送了这个通知名,就会执行对应的命令中的逻辑。
以下是ShowPanelCommand的代码:
// 显示面板的命令
public class ShowPanelCommand : SimpleCommand
{
    public override void Execute(INotification notification)
    {
        base.Execute(notification);

        // notification.Body 中存放的应为我们想创建的面板的名字
        // 使用字符串变量存储下该信息,并根据该信息来决定创建哪个面板
        string panelName = notification.Body.ToString();

        switch (panelName)
        {
            case "MainPanel":
                // 显示主面板的逻辑
                // 如果没有创建并注册 NewMainViewMediator
                if (!Facade.HasMediator(NewMainViewMediator.NAME))
                {
                    // 注册 NewMainViewMediator
                    Facade.RegisterMediator(new NewMainViewMediator());
                }

                NewMainViewMediator mainViewMediator = Facade.RetrieveMediator(NewMainViewMediator.NAME) as NewMainViewMediator;

                // 如果 mainViewMediator 中的 ViewComponent 为空
                // 表明我们没有创建面板,也没有建立 MainView 和 MainViewMediator 间的联系
                if (mainViewMediator.ViewComponent == null)
                {
                    // 1. 同步加载 MainPanel 资源;2. 实例化 MainPanel 到场景中;3. 用 MainViewMediator 的 ViewComponent 保存 MainView
                    // 第3步是为了建立起 UI面板和 Mediator 间的联系
                    GameObject mainPanelAssets = Resources.Load<GameObject>("UI/MainPanel");
                    GameObject mainPanel = GameObject.Instantiate(mainPanelAssets, GameObject.Find("Canvas").transform);
                    // mainViewMediator.ViewComponent = mainPanel.GetComponent<NewMainView>();
                    // NewMainViewMediator 的 SetView()不仅建立起 UI控件和 Mediator 的联系
                    // 还为按钮绑定了事件
                    mainViewMediator.SetView(mainPanel.GetComponent<NewMainView>());
                }

                // 显示面板后,更新数据
                // 发送通知时,通知中的 Body 存放的是数据
                SendNotification(PureNotification.UPDATE_PLAYER_INFO, Facade.RetrieveProxy(PlayerProxy.NAME).Data);

                break;

            case "RolePanel":
                // 显示角色面板的逻辑
                if (!Facade.HasMediator(NewRoleViewMediator.NAME))
                {
                    Facade.RegisterMediator(new NewRoleViewMediator());
                }

                NewRoleViewMediator roleViewMediator = Facade.RetrieveMediator(NewRoleViewMediator.NAME) as NewRoleViewMediator;

                if (roleViewMediator.ViewComponent == null)
                {
                    GameObject rolePanelAssets = Resources.Load<GameObject>("UI/RolePanel");
                    GameObject rolePanel = GameObject.Instantiate(rolePanelAssets, GameObject.Find("Canvas").transform);
                    //roleViewMediator.ViewComponent = rolePanel.GetComponent<NewRoleView>();
                    roleViewMediator.SetView(rolePanel.GetComponent<NewRoleView>());
                }

                SendNotification(PureNotification.UPDATE_PLAYER_INFO, Facade.RetrieveProxy(PlayerProxy.NAME).Data);
                break;
        }
    }


}
在此说明:
- 代码中
Facade.RegisterMediator(new NewMainViewMediator());是注册好 Mediator,这样才能使用,后续不管是Mediator、Command,还是Proxy,都能够通过全局唯一的Facade访问,Facade能够通过名字查找对应的东西。 SendNotification(),第一个参数是通知名,第二个参数是可选的,是我们想传递的数据。到时候我们会在 notification.Body 中获取这个数据。RetrieveProxy()能通过名称获取指定的 Proxy,同理,还可以获得 Mediator和 Command。
LevUpCommand的代码:
public class LevUpCommand : SimpleCommand
{
    public override void Execute(INotification notification)
    {
        base.Execute(notification);

        // 得到 PlayerProxy, 使用其中的 LevUp() 方法
        PlayerProxy tempPlayerProxy = Facade.RetrieveProxy(PlayerProxy.NAME) as PlayerProxy;
        if (tempPlayerProxy != null)
        {
            tempPlayerProxy.LevUp();
            SendNotification(PureNotification.UPDATE_PLAYER_INFO, tempPlayerProxy.Data);
        }
    }
}
6. 完成 Facade 类
Facade 即外观模式。
我们需要创建一个 GameFacade 类,来管理我们创建的
Proxy、Mediator和Command。
代码如下:
/// <summary>
/// 全局唯一的 Facade,它管理着 Proxy、Mediator 和 Command
/// </summary>
public class GameFacade : Facade
{
    // 1. 继承Facade类
    // 2. 手动实现一个单例
    public static GameFacade Instance
    {
        get
        {
            if (instance == null)
            {
                instance = new GameFacade();
            }
            // instance 是 IFacade 类型的,因此为了使用 我们这个GameFacade,需要转换
            return instance as GameFacade;
        }
    }

    // 3. InitializeController() 初始化Controller
    protected override void InitializeController()
    {
        base.InitializeController();

        // 注册命令 Command
        // 以后发送 START_UP 通知,就会执行 这个 Lambda表达式的逻辑
        RegisterCommand(PureNotification.START_UP, () =>
        {
            return new StartUpCommand();
        });

        // 注册 SHOW_PANEL 通知
        RegisterCommand(PureNotification.SHOW_PANEL, () =>
        {
            return new ShowPanelCommand();
        });

        RegisterCommand(PureNotification.HIDE_PANEL, () =>
        {
            return new HidePanelCommand();
        });

        RegisterCommand(PureNotification.LEV_UP, () =>
        {
            return new LevUpCommand();
        });
    }

    // 4. 需要有一个启动函数供外部使用,这个函数内部就执行发送通知的逻辑
    public void StartUp()
    {
        // 执行了 StartUp()方法后,就会发送 START_UP 通知,就会执行 StartUpCommand 的逻辑
        SendNotification(PureNotification.START_UP);
    }
}
在此说明:
- GameFacade 需要继承 Facade 类。
- 手动设置单例。
InitializeController()能初始化 Controller,在这个方法内部,我们通常会为注册命令。- 一个启动函数,里面执行的逻辑根据需要决定。
- 如果有需求,可以实现
OnRegister()方法。
总结
由于我的水平有限,以文章的方式讲解并不能很好地解释清楚 PureMVC 的思想,如有更好的见解,可以联系我的邮箱 turokdrake@outlook.com。
Facade:
- 全局唯一的对象,实现的是外观模式,隐藏了背后复杂的逻辑,直接管理着
Proxy、Command和Mediator。 - 它不仅可以初始化
Controller,还可以初始化Command和Mediator。 - 初始化
Controller的逻辑中,也就是InitializeController()方法中,会提前注册一些通知以及对应的命令。 - 它需要提供一个启动方法,供外部调用。
Proxy:
- 代理(Proxy)对应着一个数据对象(Data Obj)。
- 代理中会有一些修改数据的方法。
- 代理需要注册后(
RegisterProxy())才能通过Facade获取。 - 代理需要有一个名称,这个名称需要在构造函数中初始化。由于需要确保该代理的唯一性,这个名称不得更改。
Facade找代理就是根据名字寻找的。 - 代理的构造函数中有时候还会执行一些数据对象的初始化工作。(当然也可以在实例化这个代理时,传入数据对象。
Proxy类中有一个属性object Data,这个属性可以存放数据对象。
Mediator:
- 媒介(Mediator)对应着一个视图/面板(View)。
- 媒介中需要有一个名称,这个名称也在构造函数中初始化。和
Proxy一样。 Mediator如果需要使用,也需要注册(RegisterMediator()),注册后才能通过Facade管理。-
媒介中需要使用
ListNotificationInterests()方法列出该媒介感兴趣的通知,只有这样,在某处发出通知时,媒介才会执行HandleNotification()的逻辑。 HandleNotification()中是根据通知名来判断要执行哪块逻辑的。Mediator类中有一个属性object ViewComponent,这个属性存放的是视图类,这意味着它可以随时在ViewComponent中修改视图类中的控件。
Command:
- 命令(Command)是一个逻辑,一个命令干一件事(当然,如果几件事情放在一起做更好的话,也可以一起做)。
- 命令中需要重写
Execute(INotification notification)方法,这是命令模式。notification就是封装的请求。 notification中有Name属性,这是通知的名字;Body属性,是发送通知时,顺带传入的内容。Body的内容是我们根据需要决定的,比如我发送通知时,需要修改 数据层,那么我就传输数据;如果我不需要修改任何东西,那么不传也行。Command需要注册(RegisterCommand()),这样就能被Facade管理。
Notification:
- 通知,通知一定是个常量,而且全局唯一。
- 有时候会将通知放在
Facade中一起管理,也可以把通知放在一个类中管理。